
Category: Interesting
Robin and Babies
My son helped me set up his video server at home and connect it to use my phone as a camera.
In my back yard, a robin built a nest under my picnic table. I set up the phone to capture the videos that you can see below.
I included my version of Blackbird as the music accompaniment. It wasn’t long enough, so I added in a reversed section in the middle to space it out.
You can see close to the end that one of the robins was none too happy with the phone capturing his actions. He gives it the evil eye and then flies into it.
How We Hear (or, An Introduction to Fourier Analysis) | Something of the Marvelous
Jupiter closeup by Juno

Who knew that NASA was in the art business?
NASA unveiled a remarkable image of Jupiter’s northern hemisphere on its website, reminiscent of one of Vincent Van Gogh most famous paintings works, “The Starry Night.”
A Message from Visit Las Vegas
How to Relax in Vegas
That spa weekend you’ve been craving for weeks? It’s better here.
The images come courtesy of the Juno spacecraft, which recently had its 13th close flyby of the planet.
“The region seen here is somewhat chaotic and turbulent, given the various swirling cloud formations,” NASA said on its website. “In general, the darker cloud material is deeper in Jupiter’s atmosphere, while bright cloud material is high. The bright clouds are most likely ammonia or ammonia and water, mixed with a sprinkling of unknown chemical ingredients.”
NASA UNVEILS STUNNING ‘BLUE DUNE’ IMAGE SEEN ON MARS
The image shown above was taken on 1:23 a.m. EDT on May 24, as Juno was approximately 9,600 miles above Jupiter’s clouds, above a northern latitude of 56 degrees.
NASA added that citizen scientists Gerald Eichstädt and Seán Doran created the image using data from the spacecraft’s JunoCam imager.
The government space agency called out the bright oval at the bottom center of the image, stating that it appears white in ground-based telescope observations and that there isn’t any significant motion in the interior of the oval.
Thanks to JunoCam, NASA is able to see the additional structures in the weather system in the interior of this feature, though it added that there is not significant motion because, “like Jupiter’s Great Red Spot, its winds probably slow down greatly toward the center.”
Follow Chris Ciaccia on Twitter @Chris_Ciaccia
How deep is deep?
How a Single Black Belt Project Jump Starts a Successful Lean Six Sigma Effort – GoLeanSixSigma.com
This is a good case study.
Source: How a Single Black Belt Project Jump Starts a Successful Lean Six Sigma Effort – GoLeanSixSigma.com
Blackhawks emergency golaie call-up
On Thursday night in the middle of a National Hockey League game between the Chicago Blackhawks and the Winnipeg Jets, an unfamiliar figure in a No. 90 Blackhawks jersey stepped onto the ice at the United Center.
“Hey, who’s this guy?” an announcer joked.
That guy was Scott Foster, the team’s emergency goalie, a 36-year-old accountant who hadn’t played in a high-stakes hockey game in more than 10 years. He played hockey for Western Michigan University from 2002 to 2005 and plays in an amateur league, albeit a high-level one composed of former college and professional players. His venue most of the time is not the Blackhawks’ United Center, with a capacity of 23,000, but Johnny’s Ice House in Chicago’s elite league.
China Through the Years
Submitted by Taps Coogan on the 7th of February 2018 to The Sounding Line.
As part of our ongoing series of historical video-maps we present: ‘The History of China Every Year.’ Running from 1600 BC until 2017 AD, the following video shows the geographic history of the various civilizations and dynasties that have comprised the area now known as China over the last 3,617 years. Far from the stable monolithic image of modern China, the history of China is one of numerous competing states and changing borders, punctuated by occasional periods of stability such as the Yuan and Qing dynasties.
To see other interesting historical maps check out:
The History of the Greeks
Every Year of the Roman Empire
Every Other Day of the Napoleonic Wars
Every Day of World War I
Every Day of World War II
The History of the World Every Year
The Five Largest Cities Throughout History
Every Major Plague Epidemic in History
The Evolution of Modern Government
The Rise of Religions Throughout History
The History of Communism Since 1850
The History of Urbanization
The History of South America
How the World Got Obese
The History of North America
Windy High Tide at Dane Street and Lynch Park
Here’s a few pictures, note the buried benches!


Quora is fun
It’s a good place to go if you have a question and want input from others.
For instance I went there, signed in with my Google account and asked if black holes were spherical. It seems there are other geeks out there, because it was already asked and answered a few times. Give it a try if you haven’t already.
Montserrat Rock
I’ve had this sitting on my desk(s) since 1980. I picked it up while walking along a beach in Montserrat when we were recording our album.
It’s one of the few things I haven’t lost or thrown away 🙂

News | NASA Space Telescopes Provide a 3-D Journey Through the Orion Nebula
Incredible video trip through M42, one on the most magical spots of the Universe that can be seen with a good naked eye…and it happens to be in my favorite constellation.
Source: News | NASA Space Telescopes Provide a 3-D Journey Through the Orion Nebula
Look What You Made Me Do
Maxwell’s Equations Site
There is a good site that gives lots of detail about this subject.
The site is here: http://www.maxwells-equations.com/index.php#maxwells
It’s clickable to all the symbol explanations.
I wanted to request permission to post this, but I couldn’t find an email address on the website.
Decibels
This info comes from Geoff the Grey Geek site.
Understanding Decibels (part 1)
Decibels are widely used in audio, and often misunderstood. These articles give a practical understanding on using decibels in audio work. But first, some basic questions and answers about decibels.
What is a decibel?
A decibel is a tenth of a Bel, a unit of level, named after Alexander Graham Bell. A Bel is a very large unit, so the prefix deci (one tenth) is used. A decibel uses a logarithmic scale, not a linear scale like volts or watts – see below.
There is no absolute level called a decibel. A decibel is a ratio. It is relative to something. Unfortunately what it is relative to is often not mentioned when stating a decibel reading. For example, a washing machine might be said to have a loudness of 70dB, this usually means the noise it produces is 70dB higher than the threshold of hearing (0dB).
Why Decibels?
So why use a decibel? You might have noticed that the volume control on most HiFi amps is marked in decibels, as is the markings on mixer level controls. This is because our range of hearing is so vast, that to use a linear scale we would be using figures from 0 – 1,000,000!
Decibels are non linear
A secret to understanding decibels is to note that decibels are non linear. Another example of a non-linear relationship is between the side of a square and the area of a square.
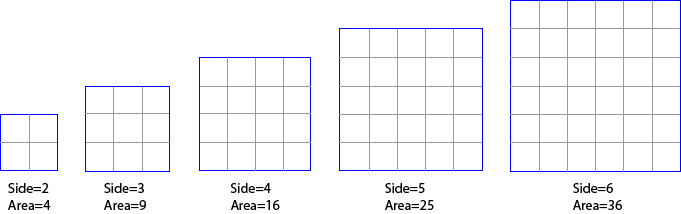 In this example, you can see that increasing the side measurement does not have an equivalent increase in area, but a larger increase. Also a doubling in the side length does not double the area – it is a lot more than the double! This is an example of a non-linear relationship – in this case, a small increase in the side relates to a differnet increase in the area. Decibels are similar. A small change in decibels relates to a different change in the ratio of the two levels being compared.
Decibels 101
When we are talking about audio levels we are looking at voltages, or sound wave amplitudes. (Note: power measurements (like the power of an amplifier or speaker) use a different formula). But without getting into formulas etc, we need to accept the following summary of linear ratios and decibels for voltages. (I’m not showing the formulas or calculations because I reckon most people skip over them anyhow, and if you like formulas any search engine will give you as many as you like)

Example One: you increase the volume on a mixer or amplifier by 6dB: this is actually doubling the voltage that will appear at the output (because 6dB is a factor of 2 – see table). So we could say the level is now +6dB, That is, relative to what the level was, it is now 6dB higher. Remember decibels are always relative to something, in this case, to what it was before we doubled (added 6dB to) the level.
Example Two: same scenario, but this time we lower the volume by 6dB. This means we are halving the voltage (because 6dB is a factor of 2). So we could say the output is now -6dB (below what it was before).
These examples also show that it is possible to have positive and negative decibels. If the voltage is +6dB, it is twice the size as it was before. If is it -6dB, then it is half the size it was before.
I know it can be hard, but stay with me here, a few more examples should help.
Let’s say we have a microphone that is giving out 1 millivolt (that is, a thousandth of a volt) when we speak into it. We plug this microphone into a pre-amp (microphone input on a camera or mixer) that has a gain of 60dB. From the table above, we see that 60dB is equal to a linear ratio of 1000. Therefore a pre-amp with a gain of 60dB is going to amplify our 1mV mic level signal by a factor of 1000, giving us a level of 1,000 millivolts or 1 volt. Behold, we now have a signal which is at line level (see article on Audio Levels).
Consequently, we could say that the level of the microphone signal is -60dB compared to the amplified line level. That is, the input is a 1000th of what the output of the pre-amp is.
In practice, most microphones will produce about 10 millivolts (when spoken directly in to), so the signal only needs to be amplified by a factor of 100 to make it up to 1 volt (0.01 x 100 = 1.0). The table above tells us that a factor of 100 is 40dB.
Most mic pre-amps should amplify the signal by at least 40 dB (x100) and some will amplify up to 60dB (x1000). Some video cameras (semi-professional or professional) will have a switch which allows you to switch the gain between 40dB, 50dB or 60dB gain for the preamp. The other way of stating this is to say the input is selected for -40dB, -50dB or -60dB levels. Just remember it is all relative, and the greater the number, the greater the amplification.
Have a look at the manual for your HiFi, mixer or video camera, and find out what level your mic input it expecting. If you are putting more in, it will probably cause distortion.
If for instance you are trying to connect a mixer (PA board) tape out, into your mic input, what do you need to consider? Well, first we need to know what the output level is likely to be. Let’s say that the specifications say the tape out (line out) is -10dBV or 316 millivolts and your mic input is looking for -50dBV (or 3.16 millivolts). This is where decibels makes it easy. We have a level of -10dB, and need to get it to -50dB, easy, use a 40dB attenuator to reduce the level. That is easier than calculating the ratio between 316mV and 3.16mV, (which when you calculate it happens to come to a linear ratio of 100 or a logarithmic ratio of 40dB).
Again, a 40 dB attenuator is indicating a ratio, in this case the ratio between the signal in and the signal out is 40dB, or a factor of 100. That is, the output is one hundredth of the input. If you want to look at other voltage gain or attenuation ratios and decibels, have a play with my Decibel Calculator for Audio
Decibels do make calculations easy, but it can be difficult to comprehend.
In the first article we saw that a decibel is not a fixed unit, rather, it is a ratio between two levels. A decibel reading on its own is meaningless if it isn’t referenced to something. Unless it is spelled out, that reference something is normally 0dB. The mic input on a camera or mixer might say -50dB, that would mean it is 50 dB lower than 0dB. The line out of a mixer or DVD player might be -10dB, meaning it is 10dB lower than 0dB. The stereo out of a mixer might be +4dB, meaning it is 4dB above 0dB.
What is 0dB?
In simple terms, 0dB is the reference level. It is the level that is being referred to. When the measured level is neither above or below the reference level, then the difference in level is obviously zero, hence our reference level is called 0dB. So what is this level? In most situations with audio, 0dB will refer to Line Level. That is, the nominal level that comes from a mixer, keyboard, camera, or DVD player etc.
What level is Line level?
This is the $64,000 question, because there are various levels that are referred to as line level. A good specification table for a camera, amplifier, mixer or recorder will always say what voltage level they are using as 0dB. There are several conventional line levels that can normally be used if no other information is stated. The secret is to pay close attention to the letter after dB.
- 0dBV refers to 0dB being one volt (1V)
- 0dBu refers to 0dB being 0.775 volts
- 0dBm refers to 0dB also being 0.775 volts, but the power formula for decibel calculations needs to used, meaning 1dBm is close to 2dBu.
Don’t get too bogged down in all this, just make sure you compare apples with apples. That is, if you are looking at two cameras or recorders or mixers and comparing the microphone input sensitivity, make sure both specifications are dBV, or both are dBu or dBm. Before we look at some real world examples, we need to appreciate that 1 volt is a high level for line levels, and not commonly seen in consumer electronics. The “standard” line level in consumer electronics is normally -10dBV, which is 316 millivolts or 0.316 volts. That is why the tape out of a mixer is often -10dBV. The same level is used for line in on digital recorders, TVs, VCRs and cameras with line in.
Camera Specifications
The popular Panasonic GS500 (similar to most cameras) states that the audio output level (line) is -10dBV (316mV). This is good because this matches the standard consumer line level found in VCRs and TVs. So when we plug the line out from the camera into the line in of a recorder or TV, the levels match and all sounds good.

The specifications also say “Mic input: mic sensitivity -50dB (0dB=1volt)”. Knowing the reference is 1 volt, and that 50dB is a ratio of 316 (see table) we can calculate the mic input is expecting 3.16 millivolts (1 divided by 316). This is about the level from a normal microphone so all will be good when a microphone is plugged in.
When a sensitive or high output microphone (eg Rode Videomic) is used, it is useful to reduce the output on the microphone so as not to overload the camera input. Hence most users switch in the 10dB attenuator on the Rode Videomic.
Mixer Specifications
A common mixer used in churches and schools is the Yamaha MG series. Its specifications are also representative of many mixers. A quick glance at the specifications reveal both dBu and dBV are used. However at the bottom of the page, they do conveniently state that 0dBu=0.775 volts and 0dBV=1 volt. They also helpfully give the equivalent voltages alongside each dB value. Let’s look at some of the specifications that will interest us if we want to connect to a mixer output.

The stereo out has a nominal output of +4dBu (1.23volts) with maximum +24dBu (12.3volts). It should be obvious that we shouldn’t connect this straight into the mic in on our camera! If we need to connect to this output, we would need to reduce the level by at least 50dB.
The better output might be the tape out. The specifications state “Record out: -10dBV (0.316 volts)”. This is closer to -50dBV (3.16mV) but still 40dB higher than nominal level for the mic input . So we need to reduce even this output by 40dB, or by a factor or 100. The other common output often used from a mixer is the headphone output. Some calculations reveal this can have a level between -9dBV to +4.77dBV, depending on the signal level and headphone volume control. This should be used only as a very last resort, and then still using at least a 40dB attenuator.
40dB attenuator
Having a range of attenuators, or a variable attenuator is useful. However a 40dB attenuator will assist in most situations. So what is a 40dB attenuator, and how do you make one? Simply put, a 40dB attenuator reduces (attenuates), or divides the signal by a factor of 100. Most music shops will sell what is often called a DI box. The DI stands for Direct Input, or Direct Injection. Either way, it is simply a box which allows instruments (like keyboards and guitars) to be directly plugged into the microphone input of a mixer. These DI boxes also change the signal to a balanced line to be able to run a longer microphone lead (more on this in a coming article). Many DI boxes have a switch which will enable you to select -40dB, -20dB or 0dB attenuation.
If you need to buy a DI box, here is a link to some of Amazon’s range of DI Boxes.
If you are trying to connect from a mixer (line out) to a video camera or laptop with only a Microphone input socket, then it is easy enough to build a simple 40dB attenuator with two resistors, (a 10K and 100 ohm resistor) and a capacitor. The circuit looks like this: 
This circuit simply divides the input which makes the output 1/101th of the input. It can be made up by anyone who knows a little about electronics and can solder. Similar circuits appear in any number of forums with slight variations. They should all work. The capacitor is used to block any DC voltage coming from the camera or from the mixer, it is not always needed.
Here is a drawing of how you might use this as an attenuator  built into a 6.35mm (1/4?) plug (this plugs into the mixer – you’ll need a 3.5mm (1/8?) plug for the mic input). Don’t forget to fit the plug cover on the cable before soldering the resistors and plug on. This doesn’t use the capacitor, but you could fit it in the plug at the other end of the cable if required.
If you want make an attenuator with a different attenuation, use can use my simple decibel calculator for audio.
I hope this has helped in understanding levels and decibels, and the why and how of connecting line level to microphone inputs.
Max Born’s Son Gustav – platelets blood vessel repair, aspirin effects on platelets.
This is a really interesting video. The part I am posting about starts about 3 minutes in. Video is from 2004.
Max Born was a physicist in the early 1900s. He was involved with defining quantum mechanics and the wave function. Go read about him on Wikipedia.
Here’s a link to the defunct vega site that this came from: http://www.vega.org.uk/video/programme/92
Land Rover OSRAM Intelligent High Beam
This is cool…notice the way that part of the headlamp dims when the other car approaches.
Great way to build a pizza
The Beatles Parting Ways documentary, with a cameo by Eric and Steve!
At 11:46 of this Beatles documentary, you can see me and my friend Eric.
When we got word that John Lennon died (During Monday Night Football), we immediately left for the Dakota in NY.
I had always wanted to see whether it was caught on video. I never thought it would be this up close!
Thanks Chuck, for letting me know about it.
Gerald Scarfe
Interesting Photos from the Past
Tesla Accident Prediction
Red Rock Park – Lynn Beach – Low Tide
Went to see a free concert here – Barry Goodreau got up on stage for a song. ‘Long Time’ – Fun!


Optical Illusions