
This is a great song. I tried to cover it well. I got Darren Garrett and Elizabeth Darcel to do vocals on it. I hope you enjoy it.

This is a great song. I tried to cover it well. I got Darren Garrett and Elizabeth Darcel to do vocals on it. I hope you enjoy it.
“Blue Sky” is a song by the American rock band the Allman Brothers Band from their third studio album, Eat a Peach (1972), released on Capricorn Records. The song was written and sung by guitarist Dickey Betts, who penned it about his girlfriend (and later wife), Sandy “Bluesky” Wabegijig. The track is also notable as one of guitarist Duane Allman‘s final recorded performances with the group. The band’s two guitarists, Duane Allman and Dickey Betts, alternate playing the song’s lead: Allman’s solo beginning 1:07 in, Betts joining in a shared melody line at 2:28, followed by Betts’s solo at 2:37. The song is notably more country-inspired than many songs in the band’s catalogue.
Performed, Recorded and Produced by Steve Keith at Baselines Designs Studio.
Here is a remix for Summer 2022. Recorded at Baselines Designs studio. Performed and Produced by Steve Keith. Vocal harmonies by @kiwichrys.

This is a song by the Pousette-Dart Band from 1977. They were a Cambridge, MA based band. @mojoespage plays the electric rhythm and the slide guitar on this one.

This is my cover of a single released in 1974 by Steely Dan and the opening track of their third album Pretzel Logic. It was the most successful single of the group’s career, peaking at number 4 on the Billboard Hot 100 in the summer of 1974.
The guitar solo on the original is by Jeff “Skunk” Baxter who would soon go on to join The Doobie Brothers.
Donald Fagen revealed that the “Rikki” in question was simply a woman he’d had a crush on in college [writer Rikki Ducornet].
This version performed, recorded and produced at Baselines Designs Studio by Steve Keith.
An old King Harvest cover. Performed, recorded, mixed and mastered at Baselines Designs studio. Video done by Megan Smith on Youtube.
This is a new song completed Jan. 19, 2022. My wonderful family gave me a new piano for Christmas and this is the first song composed on it. Thank you!

Great old Duke Ellington song redone by Steely Dan on their Pretzel Logic album, and now redone by me for my upcoming Cover Story album. The tune is accompanied by some great Buster Keaton moments.
This is another release from the album ‘The Instrumentalist’ – the song is completely remastered with some new tracks added.
This is a revamped pumped up version of a previous release, Dream a Life, to be included on the new album The Instrumentalist.

Here’s a new song called Please Saint Peter. It’s my look into the future for when the bill comes due. Written, Performed and Produced by Steve Keith.

This song is an interpretation of the whole String Theory idea, pretty much just made up from what I have read. The video is from various sources on line and the music was written, performed and produced by Steve Keith at Baselines Designs studio.
This is a song written, preformed and produced by Steve Keith.
Fighting Entropy – Every Day – and Losing.
This song is made up of some live tracks and also some loops. The video tries to portray the feeling of the song with a bunch of still images.
Here is song 2 side 1 from my new album due out shortly. This song is called Bounce. I’m a proponent of the big bounce theory and this video and song are about that.
Here is a link to the audio if you don’t want to watch the video.
This song, ‘Shine, Shine’ was written back a few years ago and refined several times. I played all the instruments and programmed the ones I don’t know how to play (horns). I always was proud of the way this song came out. This will be the first cut on my new instrumental album.

Here’s a video that goes with this song.
This is a Beatles song from the Revolver album. Dave Overland (@eipi) on vocals. I do the rest.

This is an original composition, classical in nature. You can build your own story based on your thoughts while listening.

A cover of a great old song from the 80’s. @therealmadamez on vocals, @turbomaus on guitars. I did the other bits. Originally by Tina Turner released in 1984 from her 5th album Private Dancer. It became her most successful single.

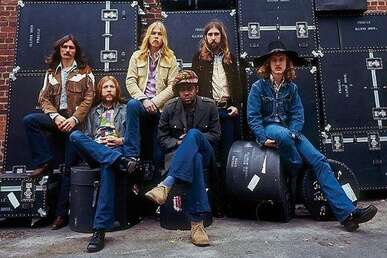
This is from the Private Lightning album released in the early 80s. I play bass on this. The picture is three band members on top of the volcano on the island of Montserrat where we recorded.

A new release by Without Focus. Dave Overland wrote and sings. Robert Foy on Keys, Mike ‘Smokey Toobz’ on Guitars. I’m on Bass, drums and production.

This is a George Harrison song from his Cloud 9 album in 1987. @mojoespage from Bandlab asked me to sing and play the piano on it – everything else is his work.

From 1963, written by John Lennon. An early experimentation by Paul with 5ths in the bass on the verses. Lead vocal by Iowa’s own Doug Cross.

Latest track from Without Focus @eipi wrote this one , sings and plays acoustic, I did bass drums and production, @rabbitwithmachinegun keys, @smokeytoobz lead guitar – from an original idea by @hawkcobo

Another great song by @therealmadamez and @the_m_project – I played bass on this one and the fab @backontrack added a stinging lead. Thanks all for letting me play. Mastered at Baselines Designs www.baselines.com

Classic Mamas and Papas track from 1965. @filun and @thetreblettes handle the vocals.

This is my cover of a great Paul Simon song from his 1986 album Graceland. It was the fifth single released. I was completely surprised that I didn’t know (until now) that it was Linda Ronstadt singing the female harmony. On my version, @kiwichrys from Bandlab does the honors.

This is an English radio station – here are some details. Dave Overland talks about Without Focus. https://www.facebook.com/112129290440054/posts/wwwweirfmcouk-saturday-kicking-off-at-1800-with-adam-francis-the-theme-show-from/161476968838619/
Here’s a jazzy metal song, a collab between Plop @backontrack, Steve @steve2k2 and @the_m_project. Plop and @the_m_project shared in the song parts and in solos but he built the melody and @the_m_project mirrored it while I played bass and mastered the mix.

This is a trick I use often and I thought you might find useful.
The Sonitus Compressor that comes free with Cakewalk is the most clear picture of what each of the compressor parameters do in my opinion.

Here you see a spike in a clip. I put the compressor on this and set the attack time at zero so it gets activated right away. I set the release to 1ms because I want it to stop acting really quickly. I just want to blunt the peak.
The two gauges on the left (input) show you the signal level. Here in this snapshot you can see I just passed the peak when I took this snap shot, but it was captured as two green lines where the peak was. I set the little pull down button just below the peaks (here about -10 db). I set the Ratio at 3:1 and the knee to hard, which you can see on the nice graph. I set the limiter on as well.
Now, the peak will be reduced. You may need to adjust the Attack time and the Release time depending on the peak you want to cut.
I’ve used the Sonitus Compressor for over 30 years and it never fails me.
For this version of the Gloria Estefan song, Madame Z adds her vocal. Check out her new album release, produced by Baselines Designs https://baselines.com/?p=5629 – All of the music and other vocals are done by Steve Schreiber, except the marimba, which I added. Bandlab is wonderful!

Written while Graham Nash was living with Joni Mitchell (and her two cats) in Laurel Canyon LA . A big thanks to @cocobark and @kiwichrys for their wonderful vocals.

Here’s a new release by Without Focus.
https://en.wikipedia.org/wiki/Red_Road_Flats – Without Focus are @rabbitwithmachinegun keys, @steve2k2 bass, drums & mixing, @smokeytoobz slide guitar solo, @eipi all other guitar and vocals.

A Kinks cover this song was released in 1965. @kiwichrys on the high parts.

Here’s my version of the Beatles song Girl.

Thanks to @kiwichrys vocals and @the_m_project guitars from Bandlab. I did the piano, bass and drum programming…oh and the whistle and cowbell 🙂

This is an original song by Cocobark. I added keys, some bass and drums and produced it.

There were a series of distinct pops in this vocal track. The first screenshot shows them and the second screenshot shows the fix. They are the 5 bars that go up the whole frequency spectrum about a quarter of the way over from the left.
I did this really quickly and it sounds acceptable. If I spent a lot of time I could probably get it perfect.
It was as easy as highlighting sections of the noise bars and cutting them out of the track. Then highlighting what remained and hitting delete. The delete function brings those sounds down without fully erasing them. I hit delete a few times and it mostly fixed the issue.


To put the final nail in Covid-19, I present for your consideration, Do the Conga. This is mostly Steve Schreiber on Bandlab. I added Marimba and produced.
Here’s a great song written by @eipi on Bandlab. Huge thanks to @bettney_ for her stunning vocal and to the guys who are ‘Without Focus’ in name only: @steve2k2 bass & mastering, @rabbitwithmachinegun Keys, @smokeytoobz guitar, @eipi vocs & the odd guitar strum!

All work done by Bandlab friends. I played Bass on this, they did all the rest.
@doesdwars at the helm @steve2k2 bass @michelefortunato trombone @cocobark vocals @jeremyabbottmusic vocals @kiwichrys vocals FUN!! #ska

@kiwichry adds her great vocals to my song about losing a loved one.

Latest release from Without Focus, our take on a lockdown song. #rock #original Without Focus are: @eipi – accoustic guitar & vox, @smokeytoobz – all other guitars, @rabbitwithmachinegun – keys, @steve2k2 bass, drums and mastering.

Sometimes a track will sound great with a few exceptions, where the player hit a note a little too strongly. Here’s a good way I’ve found to make these spikes better without having to record again.
This is not a radical example here – the spike shown is probably mostly under control, but I’m using it just to demonstrate that sometimes your eyes are almost as good as your ears.
Here is a bass note recorded into Cakewalk by Bandlab. You can see a small spike near the beginning of the note, particularly on the bottom side..

Looking at the rest of my track, this only happens in a few instances. In order not to affect most of the track, I cut so that I am only processing this one note.
In Cakewalk, I really like the simplicity and the quality of their free Sonitus plugins. You can right click on the little cut track of the note and then insert an effect only on to this clip. I’m going to put the Sonitus compressor on it.

Here’s how the plugin looks. I’ve already set some of the parameters, which I will detail below. There’s a small square in the right hand top corner where you can get to the plugin you loaded on the clip.

I’m just trying to get rid of the spike above where my cursor is. I set the attack to zero because I want the compressor to act right away. I set the release to 1ms because I only want the compressor to work for a short period of time, so that the rest of the note is not affected.
I played the note to get an idea on how loud the input is.. You can see on the bars on the left what the level is. I slide the threshold control (on the colored volume bars) down just a little to -3.3. I set a pretty hard ratio of 5.0:1 with a hard knee. There is a limiter button also, which I usually keep on.
All of these values are trial and error. Once you get something that will work, you can apply it to the note segment (select the segment, right click and bounce to clip), and the waveform you see will change. I did this here, and this is what the wave segment now looks like.

You can see that the spike is somewhat reduced. If you find that things are flattened out to much, like in the image below, you can always edit->undo in Cakewalk and get back your original waveform.

It’s a little bit of trial and error, but at least you have a visual indication of what you are working with.
This can also be done for a whole track if you need to, but it is always a good idea to try to not affect anything other than what you need to fix.
Here’s a before and after side by side.

Italy, Germany, England and USA checking in! @sibviolin violins, @michelefortunato trombones, @azzronika vocals and myself to round it out. #beatles #rock #horns #violins #iinternationalcollab

@kiwichrys on vox, @michelefortunato on the bones, @rabbitwithmachinegun on Flutes. Inspired by a recording engineer who flew to Haiti to obtain a quickie divorce. Dean Parks played the riff that Becker altered with a talk box. 1976 Royal Scam.

@thelonewulfproject and @chry-me-a-river on vocals. I play the instruments. If the video does not show, there’s a local link to it below.
Here’s a new release by the band Without Focus. Written by Dave (@eipi) at Bandlab, with Robert Foy on keys and Mike (@Smokeytoobs) on Bandlab on Electric Guitar. Dave plays acoustic and does the vocals. I did bass and drums and produced the song.

My cover of a song by Joe Jackson. Released unsuccessfully in October 1978, re-released in 1979 and was a hit. @thelonewulfproject on vocals.
